
Cosmetic Dentistry Case Study • Newport Beach
4 No-Prep Feldspathic Veneers • Additive Dentistry • Digital Smile Design • 2 Appointments • Completed in Under 2 Weeks
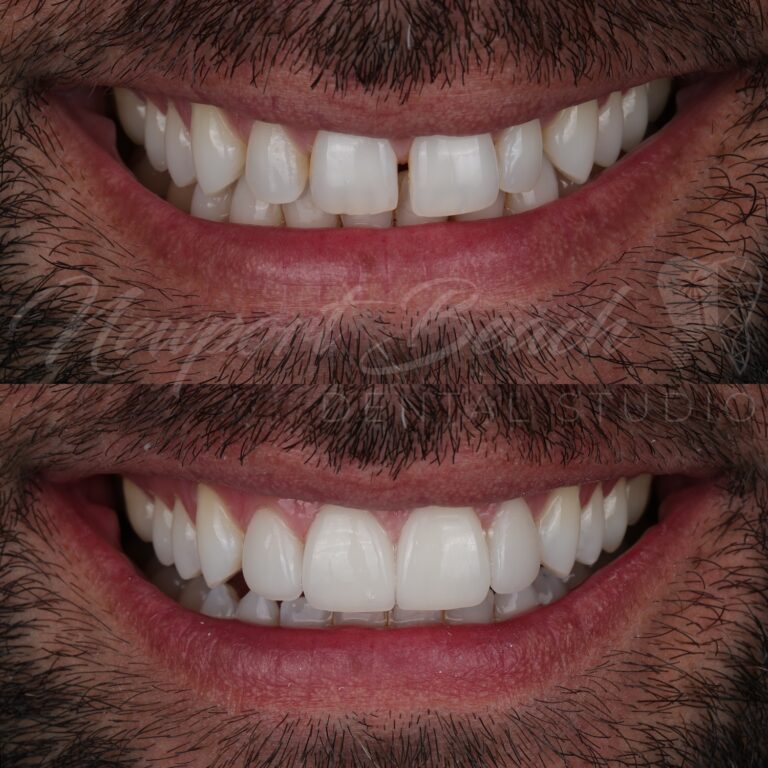
Four additive no-prep feldspathic veneers were used to improve spacing, tooth dimensions and anterior symmetry while preserving the underlying enamel.
A Wedding Smile With Almost No Time to Spare
This patient came to Newport Beach Dental Studio shortly before traveling internationally for his wedding photo shoot. The timeline was extremely limited, giving us just under two weeks to plan and complete the cosmetic treatment.
His primary concerns were the uneven appearance of his upper front teeth, multiple spaces between the teeth and differences in tooth size and proportion. He also wanted the teeth to appear straighter and more symmetrical without beginning orthodontic treatment immediately before the wedding.
Fortunately, his starting anatomy created a very specific opportunity. The teeth we wanted to modify were relatively small and there was existing space available between them. Rather than needing to reduce tooth structure to create restorative room, this smile could be improved primarily by adding carefully planned volume.
What We Changed
BEFORE
- Multiple spaces between the upper front teeth
- Uneven anterior tooth dimensions
- Differences in tooth length and width
- Less symmetrical anterior proportions
- Minor apparent alignment discrepancies
- Relatively small teeth creating favorable restorative space
- Extremely limited treatment timeline before wedding travel
AFTER
- 4 no-prep feldspathic porcelain veneers
- Visible spaces significantly reduced
- Improved tooth dimensions
- More symmetrical anterior proportions
- Improved apparent alignment
- Natural surrounding tooth shade preserved
- Existing enamel maintained with an additive approach
- Treatment completed in under two weeks
Why This Patient Was a Candidate for No-Prep Veneers
No-prep veneers are not appropriate for every cosmetic veneer patient. Successful additive treatment depends heavily on the starting position, dimensions and orientation of the natural teeth.
If a tooth is already excessively prominent, facially positioned or too large, simply adding porcelain to its surface can create excessive bulk and unfavorable contours. Significant malposition may also require orthodontic movement or conventional restorative preparation rather than an additive veneer.
This patient presented with almost the opposite situation. His anterior teeth were relatively small and separated by existing spaces. The desired cosmetic change required additional width and contour, meaning the available space could be used constructively instead of being created through enamel reduction.
This is exactly the type of anatomy in which a carefully planned no-prep approach can make sense.
Additive Dentistry — Not Simply “No Drilling”
The goal of conservative dentistry is not to label every case as “no-prep.” The goal is to perform the least amount of irreversible treatment necessary to accomplish the patient’s functional and esthetic objectives.
In this case, the existing spacing and smaller tooth dimensions gave us room to build the new proportions externally. The porcelain could therefore be added to the enamel instead of creating space by significantly reducing healthy tooth structure.
Planning the Smile to Fractions of a Millimeter
When four teeth are being enlarged to close multiple spaces, small dimensional errors can quickly create teeth that appear asymmetric or disproportionately wide.
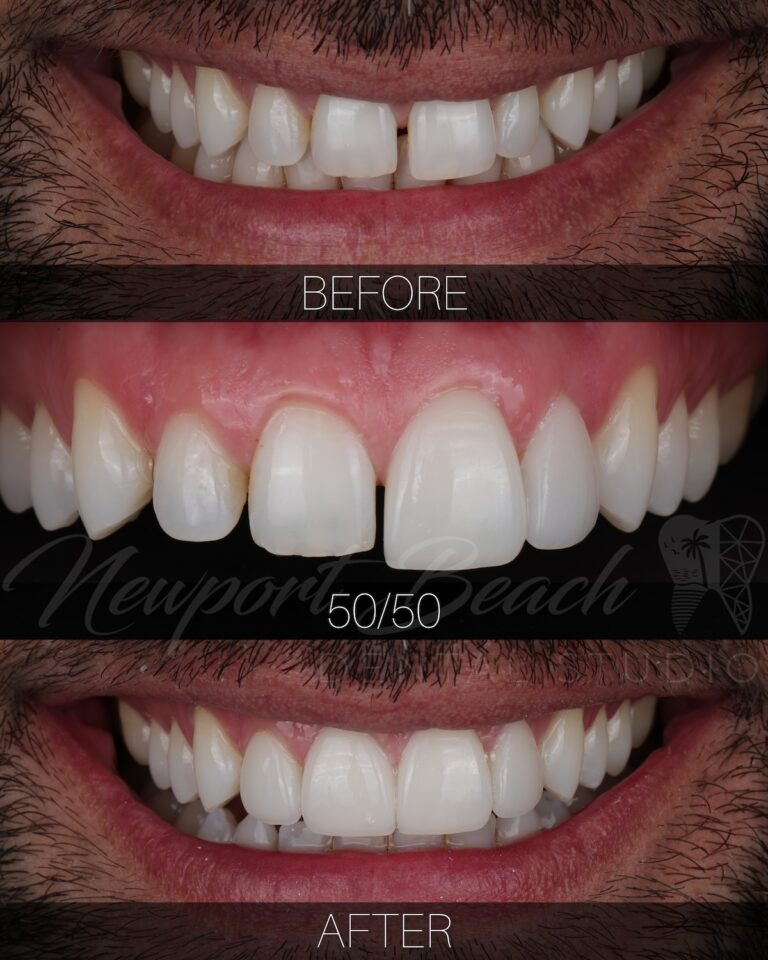
The 50/50 comparison demonstrates how carefully distributing additional width across the four veneers improved spacing and symmetry without creating excessively broad teeth.
Digital Smile Design Was Critical
The greatest technical challenge in this case was not simply closing the spaces. It was deciding exactly how much volume should be added to each individual tooth so the final four teeth appeared proportional and symmetrical.
Digital scans, clinical photographs and smile-design software allowed the proposed dimensions to be planned at a very fine scale before the ceramics were fabricated.
The width added to one tooth influences the space available for the adjacent tooth. Central dominance, lateral-incisor width, incisal position and the progression toward the canines therefore had to be coordinated as a single design rather than treating each space independently.
The proposed smile was reviewed with the patient before fabrication so that the final restorations could be produced from an approved digital design despite the compressed timeline.
Evaluating the Veneers From the Side
Oblique views are especially important in a no-prep case because they reveal facial contour and whether the added porcelain appears naturally integrated or excessively bulky.
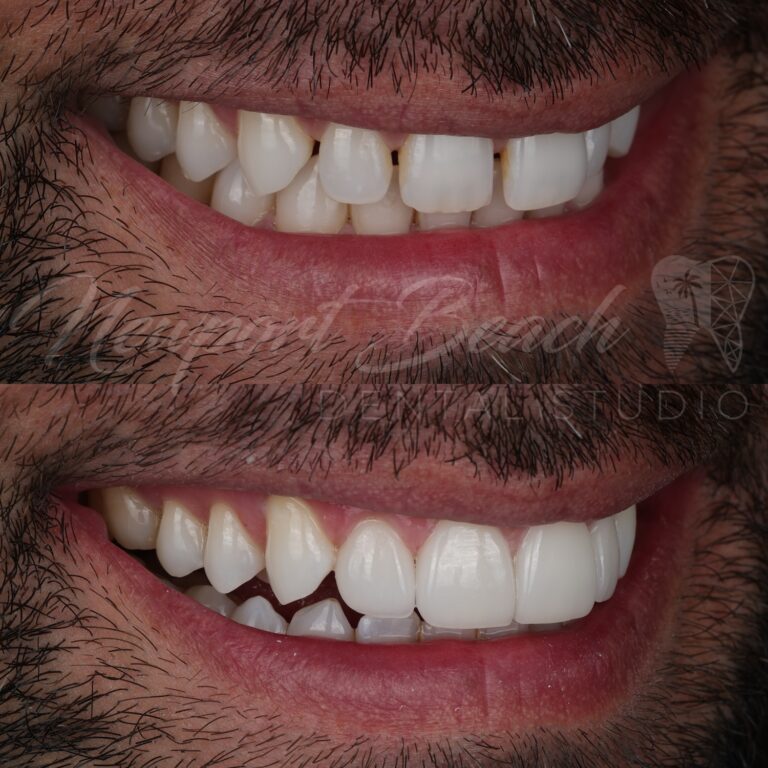
The oblique comparison demonstrates how the additive veneers integrate into the existing facial contours while improving anterior tooth size and alignment.
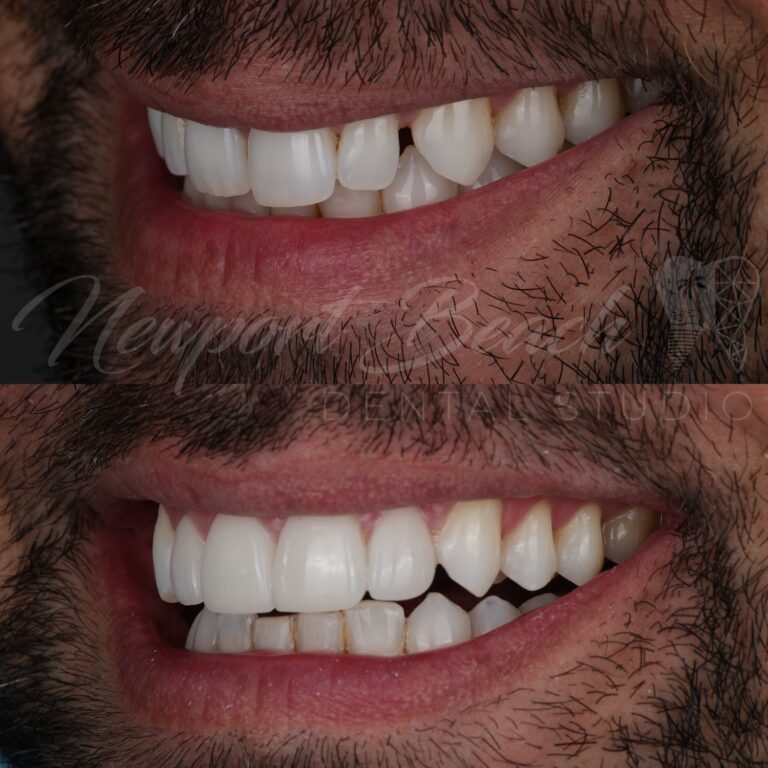
The opposite oblique view confirms a balanced transition from the four new feldspathic veneers into the surrounding untreated natural dentition.
Feldspathic Porcelain vs. Layered E.max
Feldspathic porcelain is traditionally built in very thin layers by a ceramic technician. It offers excellent control over translucency, internal characterization and surface texture and can be fabricated extremely thin for carefully selected additive cases.
E.max is a lithium-disilicate ceramic with greater intrinsic material strength. In layered E.max restorations, a lithium-disilicate foundation can be combined with additional porcelain characterization to provide both structural support and customized optical effects.
Neither material is automatically superior for every case. Material selection depends on available enamel, tooth position, restorative thickness, color-change requirements, occlusion and the amount of structural support needed.
For this highly additive four-unit case, feldspathic porcelain provided the thinness and optical control needed to blend the restorations naturally into an already bright BL2 dentition.
Color Matching an Already Bright Smile
The patient’s natural dentition was already approximately BL2 in value, so substantial whitening was not the objective of treatment.
Instead, the challenge was to fabricate four porcelain restorations that would integrate with the existing bright surrounding teeth while simultaneously changing their dimensions.
Because thin feldspathic porcelain allows the underlying enamel and bonded interface to contribute to the final optical result, careful ceramic layering and shade communication were particularly important.
Occlusion Matters in No-Prep Veneers
Minimal preparation does not mean minimal treatment planning. Thin bonded porcelain still has to function within the patient’s bite.
Occlusion, anterior guidance and parafunctional habits must be evaluated before selecting this type of restoration. Heavy grinding, destructive bruxism or unfavorable functional contacts may substantially increase the risk of ceramic fracture.
Patients should also avoid using porcelain-restored teeth as tools — including biting fingernails, tearing packaging or opening bags — because these activities introduce forces the restorations were not designed to withstand.
Meticulous Enamel Bonding
Bond strength was particularly important because these restorations relied on adhesive attachment to preserved enamel.
Before bonding, plaque disclosure was used to identify residual biofilm. The enamel surfaces were thoroughly cleaned and polished, with micro-abrasive air cleaning used as indicated to remove residual film and create a clean bonding field.
The feldspathic veneers were then adhesively bonded using Variolink Esthetic resin cement following the appropriate Ivoclar ceramic and enamel bonding protocols.
Careful isolation, ceramic surface treatment, enamel conditioning and complete removal of excess resin cement were critical components of the delivery appointment.
Completed in Two Appointments
01 — Consultation, Records & Digital Smile Design
The first appointment included the cosmetic consultation, clinical photographs, digital scans and complete records. The patient’s concerns regarding spacing, tooth dimensions, alignment and the wedding timeline were evaluated.
A digital smile design was created to determine how the available spaces should be distributed across the four restorations and to establish the proposed tooth dimensions and symmetry. The patient reviewed and approved the planned smile before ceramic fabrication.
The first appointment required approximately one hour.
02 — No-Prep Feldspathic Veneer Delivery
At the second appointment, the enamel surfaces were disclosed, meticulously cleaned and prepared for adhesive bonding. The four feldspathic veneers were evaluated for fit, proportions, symmetry, contacts and color before definitive bonding.
The veneers were bonded with Variolink Esthetic resin cement using the appropriate Ivoclar adhesive protocol. The delivery appointment required approximately two hours.
After cementation, the bite and contacts were evaluated and final radiographs were obtained to verify the interproximal areas and confirm that no detectable excess cement remained.
Treatment Details
| Treatment | No-prep feldspathic porcelain veneers |
| Number of Veneers | 4 |
| Preparation | No-prep / additive approach |
| Material | Layered feldspathic porcelain |
| Natural Tooth Shade | Approximately BL2 |
| Primary Concerns | Spaces between teeth, uneven tooth dimensions, asymmetry and minor apparent alignment discrepancies |
| Treatment Goals | Close visible spaces, improve tooth dimensions and symmetry, enhance apparent alignment and preserve natural enamel |
| Case Selection | Favorable for additive treatment due to relatively small teeth and existing restorative space |
| Digital Planning | Clinical photography, digital scans and digital smile design |
| Appointments | 2 — records and digital planning, definitive veneer delivery |
| First Appointment | Approximately 1 hour |
| Delivery Appointment | Approximately 2 hours |
| Bonding Material | Variolink Esthetic resin cement |
| Bonding Protocol | Ivoclar adhesive protocol |
| Post-Delivery Verification | Occlusal evaluation, contact verification and postoperative radiographs |
| Protection | Upper retainer fabricated after treatment |
| Total Timeline | Completed in just under 2 weeks |
Protecting the Final Result
After the veneers were delivered, the patient was digitally scanned for an upper retainer.
The retainer helps maintain tooth position and provides an additional layer of protection for the porcelain restorations during sleep. Continued routine examinations and professional maintenance remain important for monitoring the veneers, surrounding enamel and occlusion over time.
The Final Result
Four carefully planned restorations were enough to create a meaningful change in the entire anterior smile.
The visible spaces were reduced, tooth dimensions became more consistent and the progression across the upper front teeth became more symmetrical without requiring significant removal of healthy enamel.
Because the patient’s natural teeth were already bright, the feldspathic restorations could focus on form, proportion and optical integration rather than attempting a dramatic color change.
Most importantly, the entire process was completed within the patient’s compressed wedding timeline so he could travel for his photo shoot with the smile he wanted.
Considering No-Prep Veneers?
No-prep veneers can be an excellent conservative treatment in the right patient, but they are highly dependent on case selection. Existing tooth size, position, spacing, bite, available enamel and functional habits all need to be evaluated before deciding whether an additive veneer approach is appropriate.